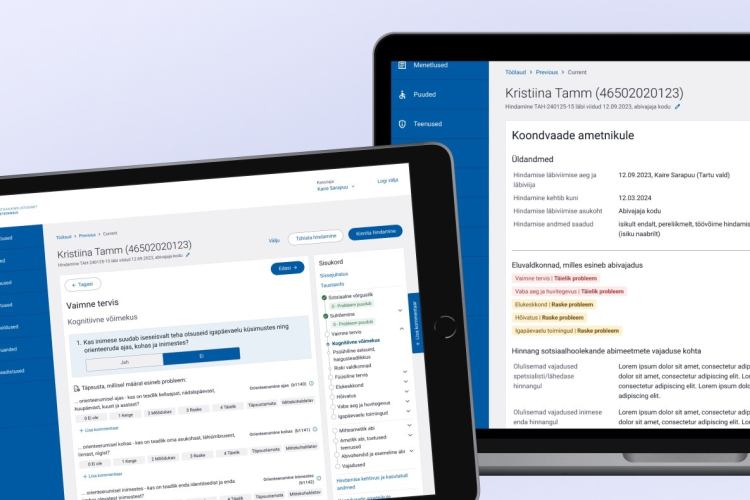
Beyond Page Views: Analysing Content Engagement with Google Tag Manager
If we don't know how visitors behave on our website, we don't know which content (such as a blog post) resonates with them and which doesn't. We also need to find out which content should be improved to make it more attractive to visitors.
A powerful and user-friendly tool, Google Tag Manager (GTM), can help. This article shows how to create a simple and effective solution for tracking "likes" on blog posts. This solution can help you make better content management and production decisions based on audience needs. In addition, tracking "likes" can help identify areas where content needs improvement.
GTM offers customization and integration options, as well as real-time tracking of user interactions. These features make it a powerful tool for gaining insight into user behaviour and improving the user experience. It allows easy identification of trends and necessary adjustments.
We can only evaluate content quality based on user feedback, which is often difficult to obtain and measure. Typically, users do not want to spend time giving long and complex feedback, but we miss important clues in that case.
GTM is an excellent tool for tracking user activity and getting feedback. The great advantage is that marketing and sales teams can handle these solutions without bothering developers :)
First, let's clarify some theoretical basics.
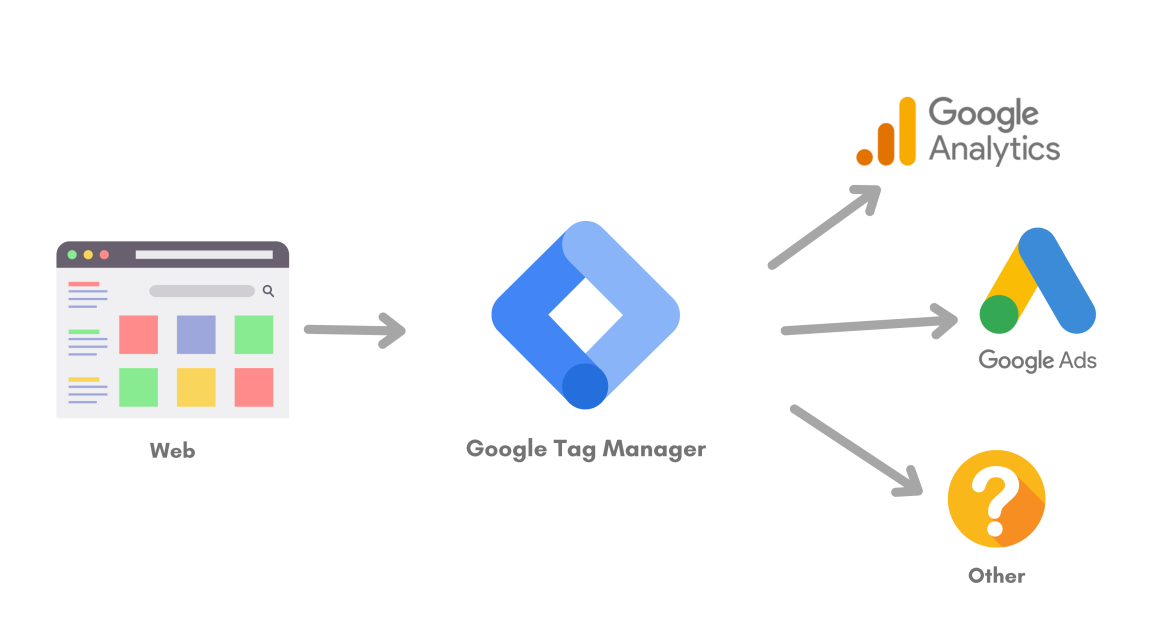
Google Tag Manager (GTM) is a free tool that allows business developers to manage and apply their website tags in one place. Tags are code snippets that make it easy to track visitor activity without involving developers, as they do not require JavaScript coding. GTM is particularly effective with another tool - Google Analytics (GA).
Figure 1. Google Tag Manager
What is the difference between Google Tag Manager (GTM) and Google Analytics (GA)?
Google Analytics (GA) and Google Tag Manager (GTM) are free tools. GA helps analyze a company's website or blog and provides a comprehensive overview of digital and marketing campaigns. Both tools are often used together to understand website performance better.
GA is primarily used for analyzing website data, while GTM is used for sending data to GA. GTM is a tool used for tag implementation and storage, but it does not have the ability to analyze reports. Therefore, data is sent to GA.
Important features and main uses of Google Tag Manager (GTM)
GTM has three main components:
- tag – a small part of Javascript code or tracking pixel;
- trigger - determines when, where, or how the tag should be activated;
- variable - provides additional information necessary for the proper functioning of the tag and trigger
Tags are small pieces of code used for collecting data or performing specific actions on a website. They can be used to track analytics, set up remarketing campaigns, or even trigger conversion pixels.
Triggers are used to determine when the tag should be activated on a website. The trigger is essentially a set of conditions that must be met before the tag is activated
Variables are used for storing and retrieving data used in tags and triggers. They can store information such as a specific page URL, button text, or form field value.
GTM has the potential to track a large amount of marketing activity, but the most commonly used functionalities are:
- downloads
- scrolls
- clicks
- forms
- videos
A practical guide for tracking "likes" using Google Tag Manager (GTM)
Knowing whether posts are pleasing to readers is important because it helps to understand what type of content appeals to visitors and what does not. We can use this information to create more engaging and relevant content, increasing the number of people visiting the website and encouraging them to share or save posts.
In addition, understanding user preferences can help identify areas that need improvement, such as making posts more readable or adding more images.
Assuming you have already set up GTM and GA4 and added the necessary tracking codes to your website, you now want to track the post "likes" statistics, but there is no separate button for this code. In this case, we create the corresponding buttons in GTM and use them to send statistics to GA.
1. First, we create a tag in GTM by selecting it from the left menu and clicking the "New" button in the upper right corner.
Figure 2. Creating a new tag
2. Then we give the newly created tag a clear and understandable name, such as "Blog likes". If the website has many tags, it is possible to quickly and efficiently find the desired tag by its clear name. You can also use the search function, which is located next to the "New" button.
Figure 3. Naming the tag
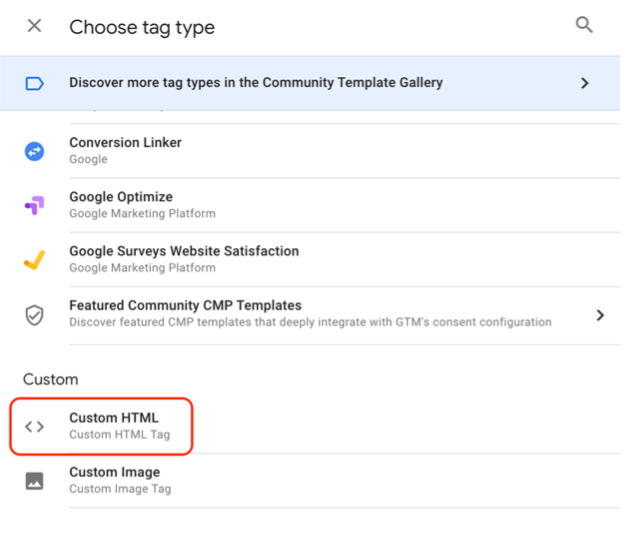
3. Next, we select the tag type by pressing the Tag Configuration section. You need to select Custom HTML from the Custom section, which allows you to copy an existing HTML or JavaScript code which has already been created for this example.
Figure 4. Selecting the tag type
Since we currently want to create buttons for tracking "likes" in the blog, one of the options is to add thumbs-up and thumbs down variants, which clearly indicate whether readers like the blog post or not.
Figure 5. Example of a solution in a blog
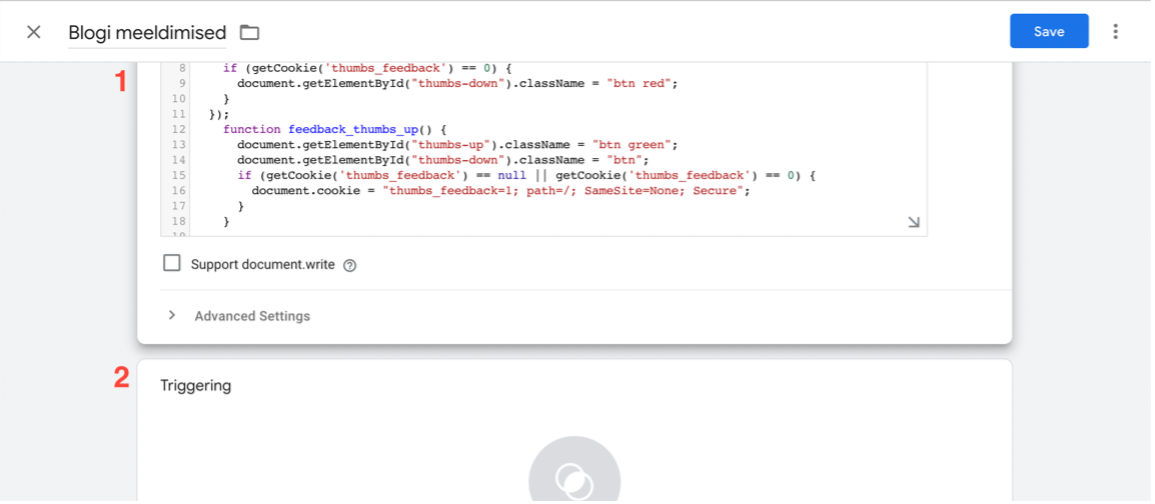
4. We continue by selecting Custom HTML tag. If the area for adding code has appeared in GTM, then the following code should be added in full. This code creates the exact same buttons in the desired blog post as in the previous example, thumbs up and thumbs down.
<script type="text/javascript" src="https://cdn.jsdelivr.net/npm/bootstrap@4.3.1/dist/js/bootstrap.min.js"> </script>
<script type="text/javascript" src="https://use.fontawesome.com/fe459689b4.js"> </script>
<script>
function feedback_thumbs_up() {
document.getElementById("thumbs-up").className = "btn green";
document.getElementById("thumbs-down").className = "btn";
document.getElementById("thumbs-up").style.display = "none";
document.getElementById("thumbs-down").style.display = "none";
document.getElementById("thank-you-message").style.display = "block";
document.getElementById("feedback-title").style.display = "none";
sendThumbsUpEventToGTM('thumbs up');
}
function feedback_thumbs_down() {
document.getElementById("thumbs-down").className = "btn red";
document.getElementById("thumbs-up").className = "btn";
document.getElementById("thumbs-down").style.display = "none";
document.getElementById("thumbs-up").style.display = "none";
document.getElementById("thank-you-message").style.display = "block";
document.getElementById("feedback-title").style.display = "none";
sendThumbsDownEventToGTM('thumbs down');
}
function close_modal() {
document.getElementById("thank-you-message").style.display = "none";
document.getElementsByClassName("thumbs_feedback")[0].style.display = "none";
}
function sendThumbsUpEventToGTM() {
dataLayer.push({
'event': 'feedback',
'eventCategory': 'feedback',
'eventAction': 'click',
'eventLabel': 'thumbs up'
});
}
function sendThumbsDownEventToGTM() {
dataLayer.push({
'event': 'feedback',
'eventCategory': 'feedback',
'eventAction': 'click',
'eventLabel': 'thumbs down'
});
}
</script>
<link href='https://cdnjs.cloudflare.com/ajax/libs/twitter-bootstrap/4.1.3/css/bootstrap.min.css' rel='stylesheet'/>
<style>
.btn i.fa-thumbs-up:hover {
color: #0BA875 !important;
}
.btn i.fa-thumbs-down:hover {
color: #E60067 !important;
}
</style>
<div class="thumbs_feedback">
<div class="thumbs_feedback_title" id="feedback-title">HINDA SISU</div>
<button class="btn" id="thumbs-up" value="" onclick="feedback_thumbs_up()">
<i class="fa fa-thumbs-up fa-lg" aria-hidden="true" value="" for="positive"></i>
</button>
<button class="btn" id="thumbs-down" value="" onclick="feedback_thumbs_down()">
<i class="fa fa-thumbs-down fa-lg" aria-hidden="true" value="" for="negative"></i>
</button>
<div id="thank-you-message" style="display: none">
Aitäh tagasiside eest!
<span class="close" onclick="close_modal()">×</span>
</div>
</div>
Figure 6. Code for this example
5. Once the code is copied, we select the triggering that will execute this code.
Figure 7. Adding a new trigger
To create a new trigger, click on the plus sign (+) in the top right corner.
Figure 8. Adding a new trigger
6. Like with the tag, we also give the trigger a suitable name. We want to know if readers liked the blog post, so we must find a suitable trigger. Since visitors need to read a bit beyond the headline to form an opinion, a suitable time to ask for an opinion is when the reader has read half of the content.
GTM understands this based on scrolling. So, to give an adequate rating to the blog post, at least 50% of the content should be scrolled.
Figure 9. Naming the trigger
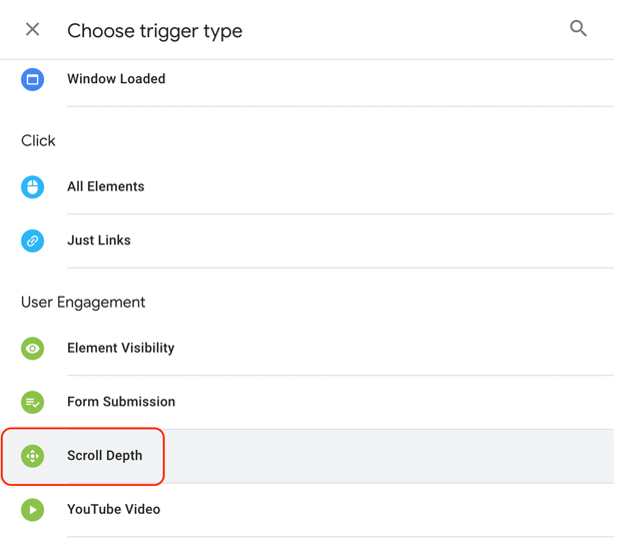
7. Next, choose "User Engagement" as the trigger type from the Scroll Depth section.
Figure10. Choosing the trigger type
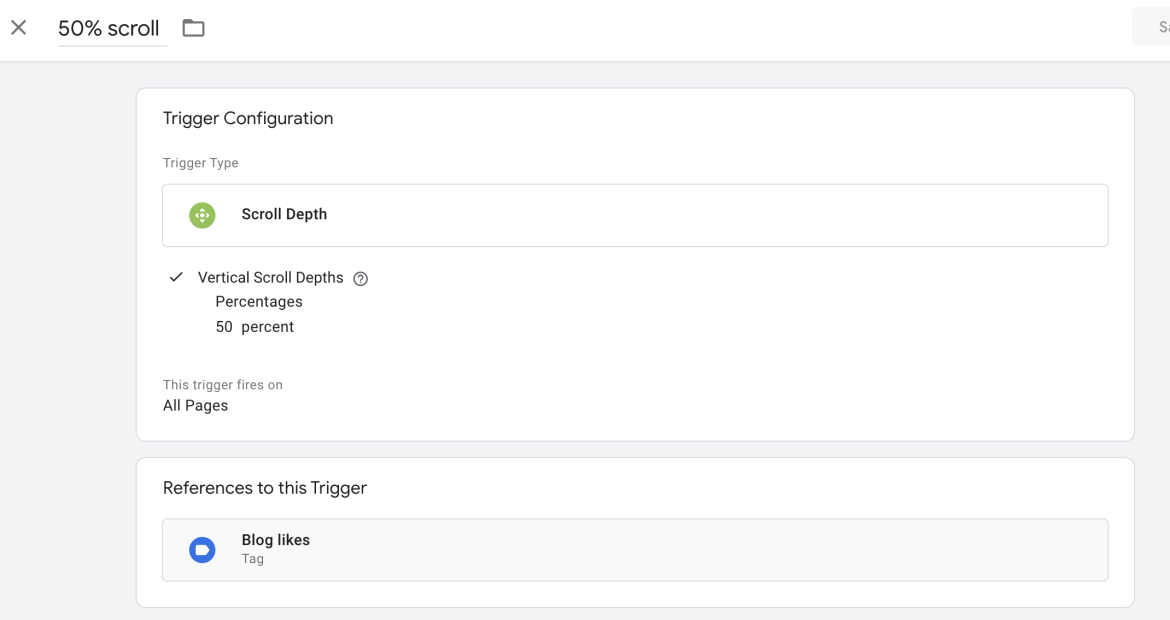
Select Vertical scroll depth from the settings, meaning scrolling occurs vertically from top to bottom. And the previously added code should run when the user has scrolled 50% of the website, so add 50 as the percentage.
Figure 11. Setting up the trigger
The remaining settings can be left the same. Be sure to save the changes by clicking "Save".
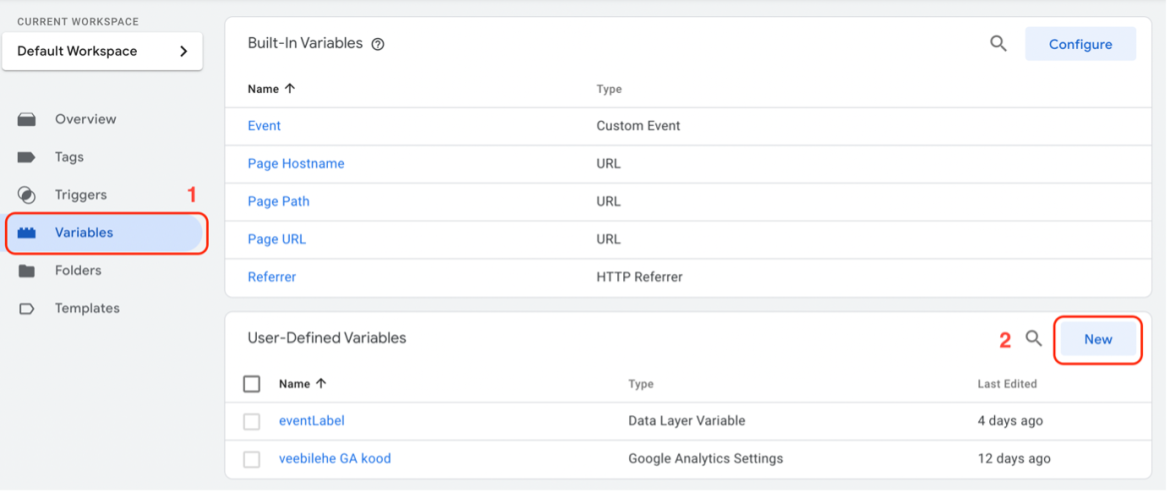
8. We also create a new variable because there are two different buttons for which information needs to be sent separately to GA. To do this, click on the "New" button on the right side of the User-Defined Variables section.
Figure 12. Adding a new variable
This must be configured and named exactly as shown in the image below, which is important because the previously added code contains the same values that GTM uses to obtain information.
Variable Type – Data Layer Variable
Data Layer Variable Name – Event Label
Data Layer Version – Version 1
Figure 13. Naming and setting up the new variable
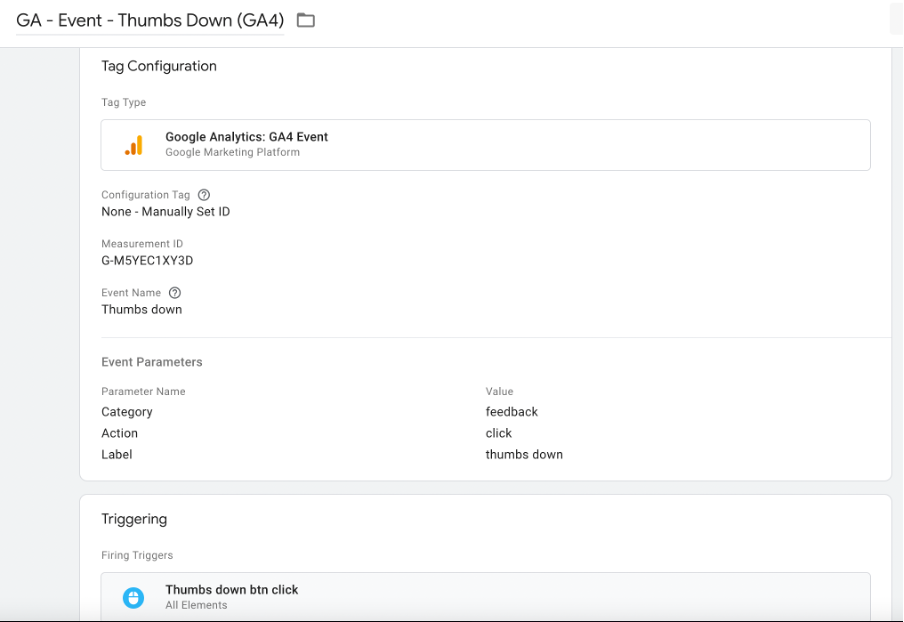
9. Next, we create new tags to send button click information to Google Analytics, and for this, you must select the Tag Configuration option from the Featured section: Google Analytics: GA4 Event. The following steps need to be added as follows (see also Figure 14:
Firstly, from Configuration Tag list you must first chose None – Manually Set ID and enter your GA4 account Measurement ID.
Then add the following:
Event name – Thumbs up
Category – feedback
Action – click
Label – thumbs up
Figure 14. Setting up the "Thumbs up" button tag
By clicking on the Triggering area, create a new trigger for the Thumbs up button click.
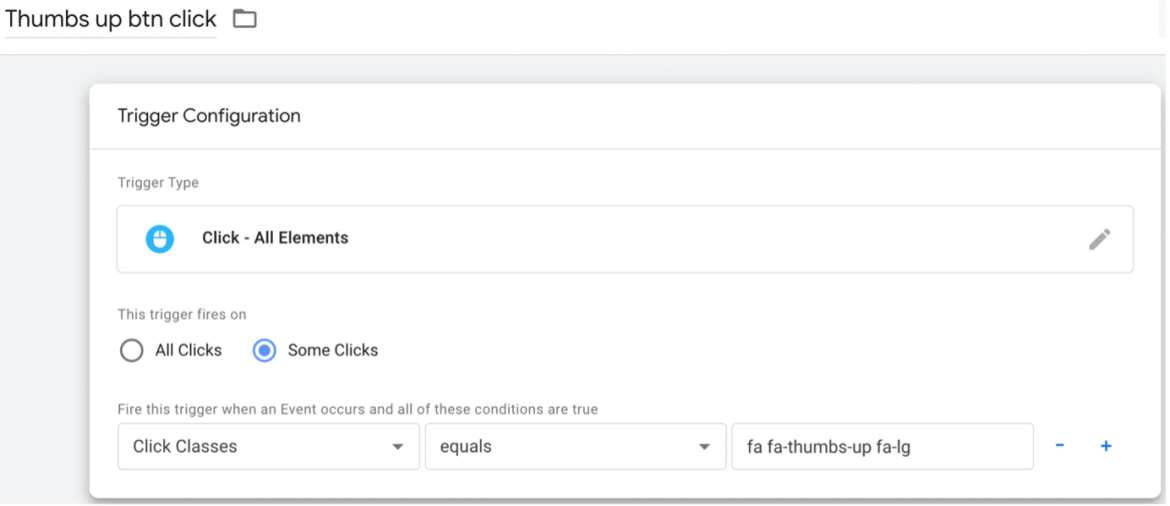
First, give the trigger a name, such as Thumbs up button click. Then, in the Trigger Configuration section, select Click from the All elements section as the trigger type.
The following steps should be followed exactly as shown in the image below to ensure that the trigger works correctly:
- This trigger fires on – Some clicks
- Fire this trigger when an Event occurs and all of these conditions are true – In the first field, select Click Classes. If you can't find it right away, click on Choose Built-In variable, where you'll find Click Classes in the options. In the next field, select "equals" and add "fa-fa-thumbs-up fa-lg" to the last field. This must be copied exactly, as GTM will understand that the Thumbs up button was clicked based on this class.
Figure 15. Setting up the "Thumbs down" button tag
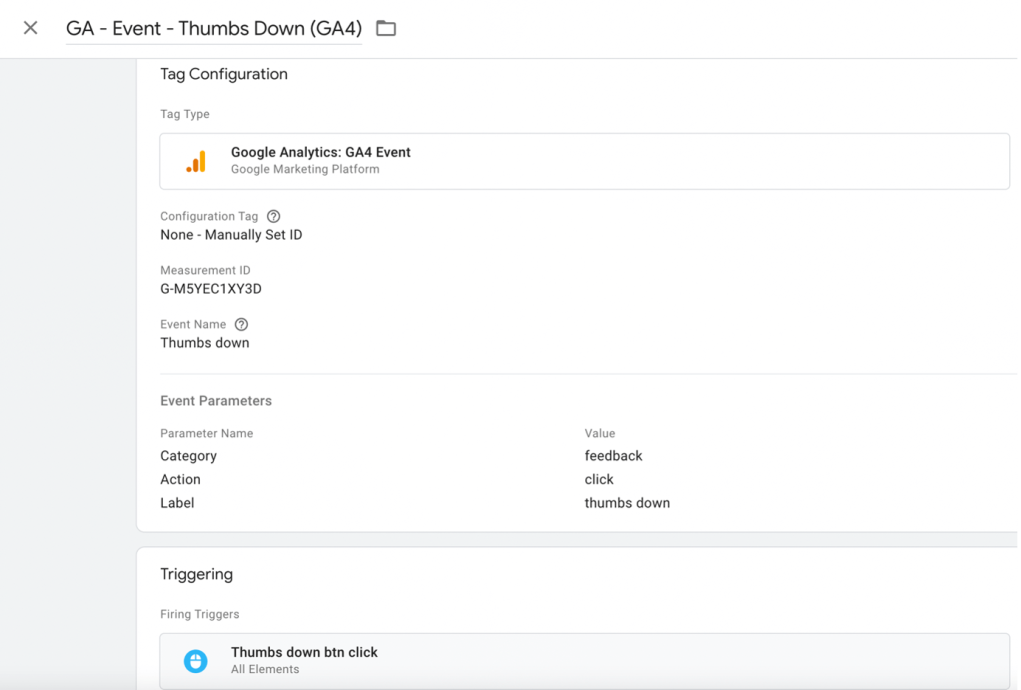
10. Repeat this process to create the tag for the Thumbs down button.
Figure 16. Setting a new "Thumbs down" button tag
Create a new trigger for the Thumbs down button click in the Triggering area. First, give the trigger a name, such as Thumbs down button click.
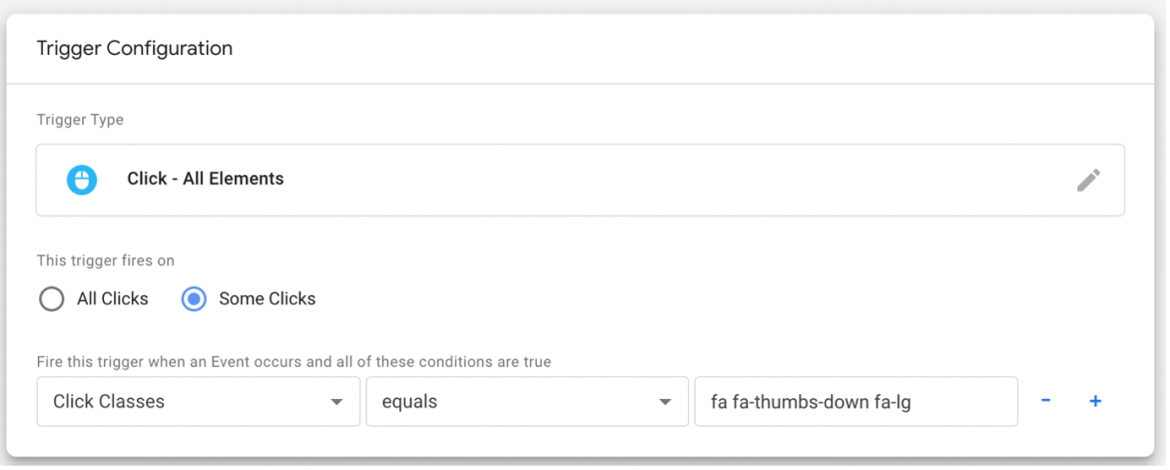
Then, in the Trigger Configuration section, select Click from the All elements section as the trigger type. The following steps should be followed exactly as shown in the image below to ensure that the trigger works correctly:
- This trigger fires on – Some clicks
- Fire this trigger when an Event occurs and all of these conditions are true – In the first field, select Click Classes. If you can't find it right away, click on Choose Built-In variable, where you'll find Click Classes in the options. In the next field, select "equals" and add "fa-fa-thumbs-down fa-lg" to the last field. This must be copied exactly, as GTM will understand that the Thumbs down button was clicked based on this class.
Figure 17. Setting a new "Thumbs down" button trigger
11. Finally, after following all the above steps, saving and naming everything correctly, click "Submit."
The end result looks like this:

Figure 18. Example of the final solution
Testing and Verification of the Created Solution
If all the above steps have been completed, it is time to check if everything is working properly and if the information is being sent to GA. To do this, click on the "Preview" button in the GTM WORKSPACE menu.
Figure 19. Preview button
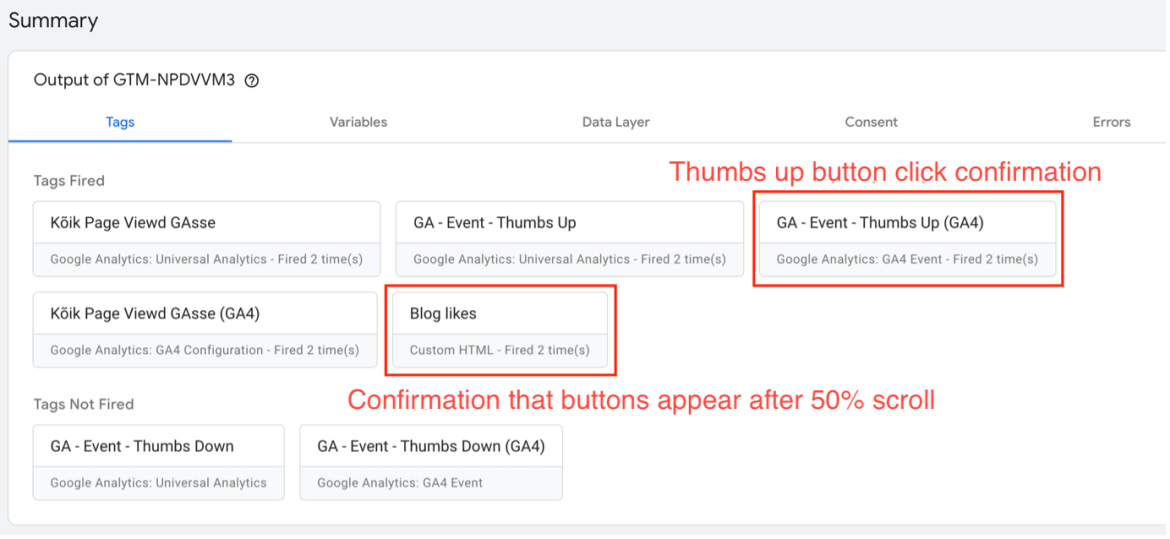
Then go to the desired web page and perform a hard refresh by pressing refresh while holding down Shift or CRTL+F5. As a result of loading the page, the just-made tags should be visible in the Tags Fired section. If you click the Thumbs up or Thumbs down buttons in the blog, the view should be as follows (with the corresponding Thumbs up or Thumbs down button tag visible):
Figure 20. Checking if the solution works
If all the added tags are working properly, we will check if the corresponding information also reached GA.
It is important to know that GA almost real-time updates the data obtained from GTM. This means that after pressing the button, the trigger should activate and send the data to GA. However, processing and displaying the data in GA reports may take more time, as GA uses a sample to aggregate large volumes of data.
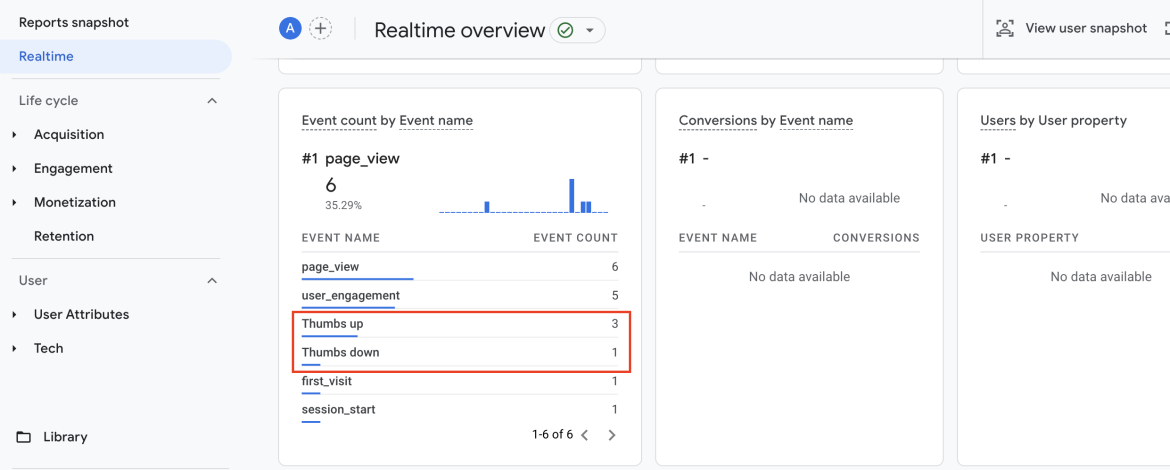
Select Real-time from the left menu and then look for Event Count by Event name section to see the results quickly. Here, you can see if the button press data reaches GA nicely. If everything is working, the created event will be visible (see Figure 19).
Figure 21. Viewing the results
If more than 48 hours have passed since the addition, it is possible to see more detailed results by selecting Engagement – Events.
Setting up tags, triggers, and variables in GTM may seem complicated, especially for those new to the platform, but practising and gaining experience makes it easier. To implement and debug the configuration, it is important to clearly understand your goals and be familiar with the terminology.
We hope you liked our our practical guide helps you in your work and makes the process of tracking website data smoother, facilitating statistics collection, and campaign optimization. And all of this without requiring technical knowledge :)
